Tuesday, September 29, 2015

Using iLogic with Autodesk Configurator 360 Webcast

Hey everyone,
Wanted to give everyone a heads up that our own Carl Smith will be hosting an upcoming webinar on using iLogic with Autodesk Configurator 360.  It's free and I'm sure you'll pick up at least one thing that will help you in all your automation endeavors.

Using iLogic with Autodesk Configurator 360
October 08, 2015 | 11:00 AM
Online | Manufacturing

Join us for this complimentary webcast as IMAGINiT expert Carl Smith explores how Autodesk Configurator 360 enables you to upload existing Inventor models to the cloud and create custom-branded 3D configuration experiences to impress your customers, give them what they need, and help grow sales of your products.

Monday, September 14, 2015

iLogic Authoring Tools

Autodesk Inventor comes with a built-in iLogic rule editor.  The iLogic rule editor, (Integrated Development Environment), can be very useful when learning to write iLogic code.  The IDE provides a built-in Snippet library as well as instant access to model parameters, etc.

But as iLogic rules become more complex or lengthy you may find waiting for the rule editor to open tedious an inefficient.  Those who know me will say I'm not a terribly patient person.  Come on already, I've got code to write!!

Additionally, as you begin to integrate more complex Inventor API calls and general .NET functions you'll find that the native rule editor does nothing to help in terms of Itelli-sense or syntax warning such as parenthesis matching.  It doesn't hurt your development efforts, but it doesn't help either.  The old adage, "If you're not helping, you're in the way", comes to mind.

In previous lives many of us used Windows Notepad to write AutoCAD LISP code.  This same simple workflow can apply to iLogic rule code as well.

Given the fact that iLogic code is not compiled and is in fact a simple ascii text file, you can virtually use any text editor you wish.  My favorite is Notepad++.  Notepad++ is an open-source text editor, is distributed free of charge. NOTEPAD++ DOWNLOAD

One of the things that makes Notepad++ such a great authoring tool for iLogic is that while it does a great job of editing text files, it can be configured to recognize the programming language format you're using and provide really nice features like color formatting, auto-complete, etc.

Additionally, there are numerous plug-ins for Notepad++ available, also free of charge. One of my favorite plug-ins is 

The following is a step-by-step process to configure Notepad++ to recognize the .iLogicVb file format.

1)  Navigate to Notepad++'s Settings>Style Configurator menu.
2) Scroll down the Language list selecting VB/VBS.
3) Add iLogigVb as a recognized user extension.
4) Adjust your color settings as desired for Comments, Numbers, Keywords, etc.
5) Add any special iLogic keywords that you wish, (keywords should be entered in lowercase only, regardless of how they're typed in the code)


This configuration gives you this:

Instead of this:

I should have added the disclaimer at the beginning of this article that to really make this workflow shine you should be using external rules.  When using external rules simple make edits in Notepad++, jump over to Inventor and run the rule.  No more waiting for the native rule editor to load the code.

Notepad++ has the added benefit of line numbers, and natively collapsible code due to the association to the VB file type.

If you're doing serious iLogic development you really owe it to yourself to check out the benefits of using Notepad++ as your iLogic development platform.


Friday, September 11, 2015

Taking the mystery out of debugging

One of the complaints I hear most often from clients and other iLogic developers is the inability to debut iLogic code from within the iLogic IDE.  I've shared similar frustrations as I'm generally a brute force kind of programmer...write some code, run it, see what breaks, fix the error, then plunge ahead again.

Don't get me wrong, I ALWAYS plan out the workflow and general design criteria of what my code needs to do ahead of time, but sometimes the semantics are either not important or completely apparent before I begin writing.

I've come to rely on a few 3rd party tools to aid my debugging process.

Method #1Utilize the built in debugger to decipher syntax errors

An often overlooked method of debugging iLogic code is the iLogic interface itself.  When asked to run code that generates an un-handled exception iLogic will throw a message box like this:


Not terribly informative.  But have you ever taken a look at the More Info tab?  You'll see a much more descriptive display of just exactly what the problem is.


Ah,...I declared a variable as a an Integer then tried to fill it with a string.
Dim i As Integer = "string"

Granted, a silly freshman mistake, but after all, this was meant as an simple example.
Don't be too quick to dismiss the simplicity of the built-in compiler debugger.

Method #2: DebugView

DebugView is a free tool distributed by Microsoft Technet.  Usage is described on Autodesk's Manufacturing DevBlog: Debug iLogic Code.  Adam Nagy does a great job of describing the basic features of DebugView and how to set it up for tracing errors in an iLogic rule.

DebugView has some really nice features such as being able to add custom filters giving a very colorful output, highlighting specific lines.  Here I've added a filter containing the text "iLogicErr".  Anytime that DebugView reads a Trace statement containing the phrase "iLogicErr" it will highlight the line making in my case errors quickly identifiable. 


In this instance I've used a Try/Catch block like this:
Try
   ‘your code goes here  
Catch ex As Exception
    Trace.TraceError("iLogicErr: #2")
End Try

Download DebugView here.

Structure the suspect code, (wrap the whole rule if necessary), as follows:

Try
   ‘your code goes here  
Catch ex As Exception
    Trace.TraceError("iLogic: " & ex.Message)
End Try

This will pass back the actual the error message that was encountered, either by Inventor or Windows.  You may still need the rune stone to figure out the cryptic generic message that iLogic throws, but you'll be in a much better position to correctly handle the exception like this:

Catch ex As Exception
    Trace.TraceError("iLogic: " & ex.Message)
    Exit Sub
    ' Goto Foo
    ' provide other useful user feedback
End Try

As an added bonus, check out my associated abbreviated DebugView article here:
Method #3: Visual Studio
The final method takes a little more effort to set up, but overall does give you more verbose and complete feedback when debugging code.

You might be thinking that wait a minute, I'm writing iLogic code, why do I need Visual Studio?  Well, I remind you that iLogic is running on top of the Microsoft .NET Framework and the iLogic IDE is really a sub-set or wrapper around some build in .NET functionality.

This built in functionality comes to our aid in the fact that that .NET calls and functions work "EXACTLY" the same in iLogic that they do in iLogic.

First, you must have a copy of Visual Studio.  I always like free and recommend using Microsoft's Express version of Visual studio.  You can download Visual Studio Express Desktop 2015 here.  VS Express Desktop 2013 is also available on the same page.  Download your preferred version and install.


To set up your debug environment start a new VB Console Application project.  You can save it using any name and location you wish.

Next you'll probably want to add a reference to Inventor so that you can take advantage of Intelli-Sense within VS.  To do this Right click on References in the Solution Explorer and browse to "C:\Program Files\Autodesk\Inventor 201(n)\Bin\Public Assemblies\Autodesk.Inventor.Interop.dll"

Next add an Imports Inventor at the top of your console app Main Module.  Starting to look familiar?

We're really working with our code at an Inventor API level, but with a few syntax changes Visual Studio can provide a superb debugging tool.

Next let's add some functionality to our code.

Time to debug!  Add a break point by clicking in the left margin.  You'll see a little red dot appear indicating where the code will stop.
We can step into this code by selecting the Start button on the main toolbar.  The code will execute and run, stopping on our break point.  And here comes the sweetness that is Visual Studio, we can step through each line, hovering over variables and objects to determine values immediately, all while the code is running. 

You can step through each line by pressing F11 or selecting the Step Into button on the Debug toolbar, (if the Debug toolbar is not visible GoTo View>Toolbars>Debug).

After stepping past the line where we declare ThisApplication, I can hover the mouse over ThisApplication and by drilling down several levels I can see this:

Powerful stuff!  While it takes a little to set up, 'most' iLogic code can quickly be converted to run inside VS.  In fact, to make my life easier I keep a VS project on my development machine that's already set up with the Inventor.Interop reference so all I have to do is plug in my problem code and set to work debugging by stepping through the code.

I hope you find this article useful.

Happy Coding!

Wednesday, September 9, 2015

DebugView & iLogic

I feel as if I've done you all a horrible disservice.  I've been using an amazing tool for the past year or so and haven't shared it with you.

DebugView is a tool that will allow you to write out variables, parameters (or just about anything you want) in real time while your iLogic rules are running.  This can be used to find those pesky bugs that may be running amuck in your code

You use DebugView in conjunction with Trace calls in your code. For example, below is a line from an iLogic rule:

Trace.Writeline("iLogic: This will output to DeBugView")

DeBugView will show this:


It's an alternative to throwing a bunch of MessageBoxes into your code.

You'll notice the iLogic: at the beginning of my string.  I use this in conjunction with the Filter tool in DebugView so that I'm not inundated with other messages.

The Filter dialog box will launch when you start DebugView.  Add something like iLogic to the Include: box to filter out everything else other than lines that include iLogic.

Another feature worth looking into is the Highlight feature.  It can highlight either the foreground (text) or the background of each output line with a color (depending on your choice in the Colors box).  I've set the filter in the image to the right to highlight the background of each line green if it has the text Debug in it and here's the output in DebugView:


I used the Highlight feature when I want to easily find specific output in the DebugView window.

As I stated earlier, you can output Parameters or variables to DebugView.  One way that I used this often is to see what a parameter is at a specific point in a rule.  In the example below, the variable   is looping from 1 to 10.  I'm combining  along with portion of the parameter End1MachLevelStep(n) to see what the parameter values are.

For stepno = 1 To 10
    Trace.Writeline("iLogic: End1MachLevelStep" & stepno & ": " & Parameter("End1MachLevelStep" & stepno))
Next


You can download DebugView from here.

Leave a comment below to let me know how you use DebugView.

"There are two ways to write error-free programs; only the third one works" ~ Alan J. Perlis

Thanks and happy debugging!
Randy

Tuesday, July 28, 2015

Vault Copy Design Action Rule Sets & iLogic Rules

You've did a Copy Design in Vault 2015 R2 (or later) of your master template and checked out the copied assembly along with all the necessary files.  You're ready to use the awesome-ness of iLogic to make your job easier so you open up the assembly in Inventor.

Woah!  Stop!  Where are all my iLogic rules?  Call Sherlock Holmes!

The Copy Design process was changed in the Vault 2015 R2 version and began using Action Rule Sets.  A rule set is a collection of property rules that determine file property behavior during a copy operation.

The default Rule Set is the culprit that stole your iLogic rules.  It is set up to remove iLogic rules!  If you are using Rule Sets in order to control file properties then you are familiar with editing the Rule Sets.  This post is only going to show you how to copy the Default Rule Set in order to create a version that keeps the iLogic rules in the copied assembly.

You need to be logged in as an Administrator to the Vault in order to manage Action Rules.

1. Start the CopyDesign Process
2. Click on the Vault symbol and select Action Rules.


3. Select the Default Rule Set and then click Copy… at the top.

4. Call it iLogic Template Rule Set or something similar.
5. Edit that newly created Rule Set.
6.     Select the iLogicRuleStatus in the lower right window then change the Value to User and then             click Replace.

8. Hit OK on all the dialog boxes to get back to the main CopyDesign.

To set the Action Rule Set to use during the Copy Design Process:

1. Start the CopyDesign Process
2. Click the drop down arrow under the Selected Rule Set button and select the newly created rule set.


This Rule Set is saved locally.  The default location is:
C:\Users\username\AppData\Roaming\Autodesk\Autodesk Copy Design 2016\CopyDesignRuleSets

I hope that helps you solve the case of the missing iLogic rules.

"Nothing clears up a case so much as stating it to another person." ~ Sherlock Holmes

Thanks,
Randy

Wednesday, July 22, 2015

External Rules & Inventor 2016

Hey folks, I hope that you've had a chance to look at Inventor 2016 and more specifically, the way External Rules are handled in the latest release.

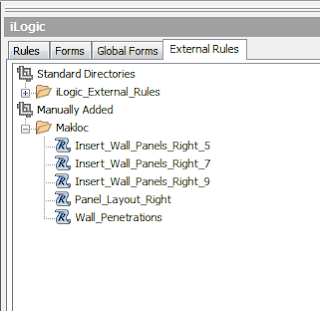
Inventor 2016 allows us to set the External Rules Directories just as previous releases had, but now, the files that are in those directories will automatically show up in the External Rules tab of the iLogic Browser.

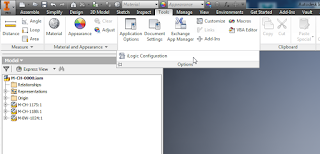
To set the External Rules Directory, go to the Tools tab of the Ribbon, expand the flyout for the Options panel and select iLogic Configuration.


Once the directories are set, rules that are in the specified folder will automatically be there for you to use!

You can also add additional files.  Right mouse click in the External Rules tab of the iLogic Browser and select Add External Rule.  Browse to the location of your rule and select it.  Inventor will create the folder structure for you under a Manually Added heading.

This makes sharing external rules throughout your design group a simpler process.

Can you think of other ways that this can help you organize your external rules?  Let me know in the Comments section below!

"You can’t wait for inspiration. You have to go after it with a club." ~ Jack London

Thanks!
Randy

Friday, July 10, 2015

HoleTable Modifications

Hey all, long time since my last post.  I apologize for that.  Busy is a good thing, right?

I recently had a chance to look at something in the Inventor API that I had yet to have a reason to: Hole Tables.  A client was spending time on many drawings modifying a hole table column based upon the hole type.  The holes are iFeatures and he could not find a way of adding this data to the iFeature so that it would populate in the hole table automatically.

This presented me with a chance to see what access we had to Hole Tables in the Inventor API.

First, I checked for a hole table and for a drawing view.  If either doesn't exist then I'd warn the user.

    '    Declare variables
        Dim oDrawDoc As DrawingDocument
        oDrawDoc = ThisApplication.ActiveDocument
        Dim oSheet1 As Sheet
        oSheet1 = oDrawDoc.Sheets.Item(1)
    
    '    Check for a hole table
        If oSheet1.HoleTables.Count = 0 Then 
            MessageBox.Show("Please ensure a hole table is present on the current drawing.", "No Hole Table",MessageBoxButtons.OK,MessageBoxIcon.Warning)
            Return
        End If

    '    Check for drawing views
        If oSheet1.DrawingViews.Count = 0 Then 
            MessageBox.Show("Please ensure a drawing view is present on the current drawing.", "No Hole Table",MessageBoxButtons.OK,MessageBoxIcon.Warning)
            Return
        End If

Next, I cycled through the Hole Table columns to determine which column numbers were the columns that I needed to either get data from or write data to.  If any of those columns don't exist then I'd warn the user.

    '    Declare variables        
        Dim oView As DrawingView
        oView = oSheet1.DrawingViews.Item(1)
        Dim oHoleTable As HoleTable
        oHoleTable = oSheet1.HoleTables.Item(1)
        Dim oRow As HoleTableRow
        Dim oColumn As HoleTableColumn
        
    '    Cycle thru each column to determine the XDIM, YDIM, DESCRIPTION and CALLOUT columns.
        iXDIMColumn = 1
        For Each oColumn In oHoleTable.HoleTableColumns
            oXDIMColumnName = oColumn.Title
            If UCase(oXDIMColumnName) = "XDIM" Then Exit For
            iXDIMColumn = iXDIMColumn + 1
        Next
        If iXDIMColumn > oHoleTable.HoleTableColumns.Count Then 
            MessageBox.Show("Please ensure hole table has a column named XDIM.", "No XDIM column",MessageBoxButtons.OK,MessageBoxIcon.Warning)
            Return
        End If
        
        iYDIMColumn = 1
        For Each oColumn In oHoleTable.HoleTableColumns
            oYDIMColumnName = oColumn.Title
            If UCase(oYDIMColumnName) = "YDIM" Then Exit For
            iYDIMColumn = iYDIMColumn + 1
        Next
        If iYDIMColumn > oHoleTable.HoleTableColumns.Count Then 
            MessageBox.Show("Please ensure hole table has a column named YDIM.", "No YDIM column",MessageBoxButtons.OK,MessageBoxIcon.Warning)
            Return
        End If

        iDescColumn = 1
        For Each oColumn In oHoleTable.HoleTableColumns
            oDescColumnName = oColumn.Title
            If UCase(oDescColumnName) = "DESCRIPTION" Then Exit For
            iDescColumn = iDescColumn + 1
        Next
        If iDescColumn > oHoleTable.HoleTableColumns.Count Then 
            MessageBox.Show("Please ensure hole table has a column named DESCRIPTION.", "No DESCRIPTION column",MessageBoxButtons.OK,MessageBoxIcon.Warning)
            Return
        End If
        
        iCalloutColumn = 1
        For Each oColumn In oHoleTable.HoleTableColumns
            oCalloutColumnName = oColumn.Title
            If UCase(oCalloutColumnName) = "CALLOUT" Then Exit For
            iCalloutColumn = iCalloutColumn + 1
        Next
        If iCalloutColumn > oHoleTable.HoleTableColumns.Count Then 
            MessageBox.Show("Please ensure hole table has a column named CALLOUT.", "No CALLOUT column",MessageBoxButtons.OK,MessageBoxIcon.Warning)
            Return
        End If

Lastly, I checked the DESCRIPTION column and read it's text.  The client had specific data that he would add to the CALLOUT column based upon the DESCRIPTION column.  I did this with a Select Case but there are many other ways of accomplishing this.  The client also wished to modify the CALLOUT column for any additional holes that are part of the same iFeature.  I accomplished this by concatenating the XDIM & YDIM for all holes and if they matched the threaded hole then I modified their CALLOUT column as well.

    '    Cycle thru each row in hole table.  Split Description column (5th) and set callout based on text for rows where XDIM and YDIM match.
        For Each oRow In oHoleTable.HoleTableRows
            oText = oRow.Item(iDescColumn).Text
            Dim oTextLeft As String() = oText.Split(New Char() {"U"c})
            sThreadData = oTextLeft(0)
            
            Select Case sThreadData 
                Case "5/16-24 "
                    sCallout = "SAE2"
                Case "7/16-20 "
                    sCallout = "SAE4"
                Case "9/16-18 "
                    sCallout = "SAE6"
                Case "3/4-16 "
                    sCallout = "SAE8"
                Case "7/8-14 "
                    sCallout = "SAE10"
                Case "1 1/16-12 "
                    sCallout = "SAE12"
                Case "1 5/16-12 "
                    sCallout = "SAE16"
                Case "1 5/8-12 "
                    sCallout = "SAE20"
                Case "1 7/8-12 "
                    sCallout = "SAE24"
                Case "2 1/2-12 "
                    sCallout = "SAE32"
                Case Else
            End Select
            
        '    Concatenate XDIM & YDIM
            If Not sCallout = "" Then
                sLocation = oRow.Item(2).Text & oRow.Item(3).Text
                Call ChangeCallout(oRow,oHoleTable,sLocation,sCallout,iXDIMColumn,iYDIMColumn,iCalloutColumn)
            End If
            
            sCallout = ""
    Next

End Sub

Private Sub ChangeCallout(ByVal oRow As HoleTableRow, oHoleTable As HoleTable, sLocation As String, sCallout As String, iXDIMColumn As Integer,iYDIMColumn As Integer, iCalloutColumn As Integer)
    For Each oRow In oHoleTable.HoleTableRows
        If oRow.Item(iXDIMColumn).Text & oRow.Item(iYDIMColumn).Text = sLocation Then
            oRow.Item(iCalloutColumn).Text = sCallout
        End If
    Next
End Sub

The entire code is here:

Sub Main
    '    Declare variables
        Dim oDrawDoc As DrawingDocument
        oDrawDoc = ThisApplication.ActiveDocument
        Dim oSheet1 As Sheet
        oSheet1 = oDrawDoc.Sheets.Item(1)
    
    '    Check for a hole table
        If oSheet1.HoleTables.Count = 0 Then 
            MessageBox.Show("Please ensure a hole table is present on the current drawing.", "No Hole Table",MessageBoxButtons.OK,MessageBoxIcon.Warning)
            Return
        End If

    '    Check for drawing views
        If oSheet1.DrawingViews.Count = 0 Then 
            MessageBox.Show("Please ensure a drawing view is present on the current drawing.", "No Hole Table",MessageBoxButtons.OK,MessageBoxIcon.Warning)
            Return
        End If

    '    Declare variables        
        Dim oView As DrawingView
        oView = oSheet1.DrawingViews.Item(1)
        Dim oHoleTable As HoleTable
        oHoleTable = oSheet1.HoleTables.Item(1)
        Dim oRow As HoleTableRow
        Dim oColumn As HoleTableColumn
        
    '    Cycle thru each column to determine the XDIM, YDIM, DESCRIPTION and CALLOUT columns.
        iXDIMColumn = 1
        For Each oColumn In oHoleTable.HoleTableColumns
            oXDIMColumnName = oColumn.Title
            If UCase(oXDIMColumnName) = "XDIM" Then Exit For
            iXDIMColumn = iXDIMColumn + 1
        Next
        If iXDIMColumn > oHoleTable.HoleTableColumns.Count Then 
            MessageBox.Show("Please ensure hole table has a column named XDIM.", "No XDIM column",MessageBoxButtons.OK,MessageBoxIcon.Warning)
            Return
        End If
        
        iYDIMColumn = 1
        For Each oColumn In oHoleTable.HoleTableColumns
            oYDIMColumnName = oColumn.Title
            If UCase(oYDIMColumnName) = "YDIM" Then Exit For
            iYDIMColumn = iYDIMColumn + 1
        Next
        If iYDIMColumn > oHoleTable.HoleTableColumns.Count Then 
            MessageBox.Show("Please ensure hole table has a column named YDIM.", "No YDIM column",MessageBoxButtons.OK,MessageBoxIcon.Warning)
            Return
        End If

        iDescColumn = 1
        For Each oColumn In oHoleTable.HoleTableColumns
            oDescColumnName = oColumn.Title
            If UCase(oDescColumnName) = "DESCRIPTION" Then Exit For
            iDescColumn = iDescColumn + 1
        Next
        If iDescColumn > oHoleTable.HoleTableColumns.Count Then 
            MessageBox.Show("Please ensure hole table has a column named DESCRIPTION.", "No DESCRIPTION column",MessageBoxButtons.OK,MessageBoxIcon.Warning)
            Return
        End If
        
        iCalloutColumn = 1
        For Each oColumn In oHoleTable.HoleTableColumns
            oCalloutColumnName = oColumn.Title
            If UCase(oCalloutColumnName) = "CALLOUT" Then Exit For
            iCalloutColumn = iCalloutColumn + 1
        Next
        If iCalloutColumn > oHoleTable.HoleTableColumns.Count Then 
            MessageBox.Show("Please ensure hole table has a column named CALLOUT.", "No CALLOUT column",MessageBoxButtons.OK,MessageBoxIcon.Warning)
            Return
        End If
            
    '    Cycle thru each row in hole table.  Split Description column (5th) and set callout based on text for rows where XDIM and YDIM match.
        For Each oRow In oHoleTable.HoleTableRows
            oText = oRow.Item(iDescColumn).Text
            Dim oTextLeft As String() = oText.Split(New Char() {"U"c})
            sThreadData = oTextLeft(0)
            
            Select Case sThreadData 
                Case "5/16-24 "
                    sCallout = "SAE2"
                Case "7/16-20 "
                    sCallout = "SAE4"
                Case "9/16-18 "
                    sCallout = "SAE6"
                Case "3/4-16 "
                    sCallout = "SAE8"
                Case "7/8-14 "
                    sCallout = "SAE10"
                Case "1 1/16-12 "
                    sCallout = "SAE12"
                Case "1 5/16-12 "
                    sCallout = "SAE16"
                Case "1 5/8-12 "
                    sCallout = "SAE20"
                Case "1 7/8-12 "
                    sCallout = "SAE24"
                Case "2 1/2-12 "
                    sCallout = "SAE32"
                Case Else
            End Select
            
        '    Concatenate XDIM & YDIM
            If Not sCallout = "" Then
                sLocation = oRow.Item(2).Text & oRow.Item(3).Text
                Call ChangeCallout(oRow,oHoleTable,sLocation,sCallout,iXDIMColumn,iYDIMColumn,iCalloutColumn)
            End If
            
            sCallout = ""
    Next

End Sub

Private Sub ChangeCallout(ByVal oRow As HoleTableRow, oHoleTable As HoleTable, sLocation As String, sCallout As String, iXDIMColumn As Integer,iYDIMColumn As Integer, iCalloutColumn As Integer)
    For Each oRow In oHoleTable.HoleTableRows
        If oRow.Item(iXDIMColumn).Text & oRow.Item(iYDIMColumn).Text = sLocation Then
            oRow.Item(iCalloutColumn).Text = sCallout
        End If
    Next
End Sub


"A very small man can cast a very large shadow" ~ Varys

Happy Coding!

Randy