About a year ago I decided I needed to do some tidying up and figure out a way to store all my iLogic code in a manner that I could easily search, retrieve and copy the code I know I have somewhere…it does X…and I wrote it for client Y….I think.
I am still on my quest to find the perfect vehicle to do everything but I recently decided to take a closer look at the simple storage method that Autodesk already gives us, Custom Snippets.
Custom Snippets work the same as the System Snippets with the difference being they are your code. They are an easy way to insert
your own bits of code into your iLogic rule.
Let’s say I've written a few lines of code that I’ll be using in a few
different parts in my current project.
Now, there are multiple ways of getting this rule into
parts. I could put it in the template, I
could use external rules, I could use the Code Injector (which is a lovely tool
that you should check out if you don’t already use it). I don’t want to argue the merits of each of
these and just focus on Custom Snippets for now.

One decision to make is how you want to categorize your Custom Snippets. You can create individual categories for specific projects, clients, code type, etc. I
prefer to create categories by either code type or client name and saving my
snippets that way.
 To insert a new Snippet category, right click in the Custom Snippets window and choose Insert Category. Enter a category. In this example I’ll be categorizing them using client names and call this one ACME. Unfortunately you cannot create nested categories.
Once you’ve created a category, it’s time to start filling
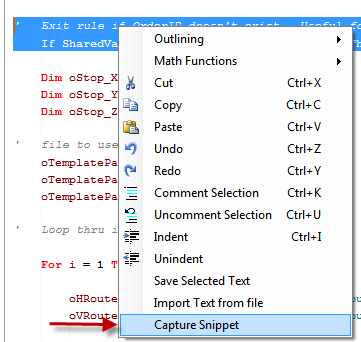
it up with all that helpful code you’ve already written. Highlight the code in the Rule Editor that
you want to save (I always select all the code, including empty spaces or tabs
to the left so that they are captured), right click and choose Capture
Snippet.
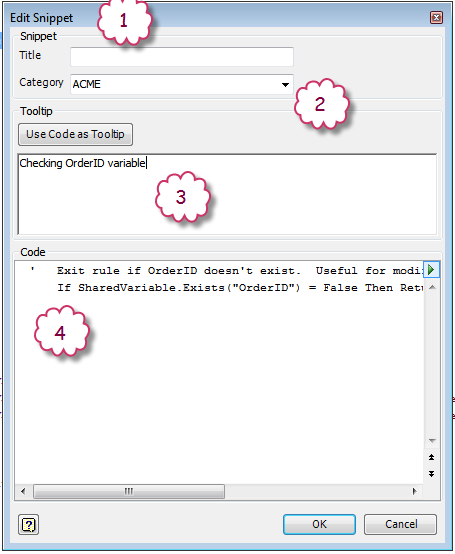
You’ll be presented with the Edit Snippet dialog box.
- Title of the Snippet. This shows in the Snippets listing.
- Which category would you like to store the Snippet?
- Text entered here will show up as a tooltip when hovering over the Snippet in the Snippet listing. I prefer a short blurb rather than using the code as the tooltip. The code is shown at the bottom of the tooltip by default.
- The code you highlighted will show up here. You can edit here but I find it easier to edit in the Rules Editor.
As my favorite knigget said “That’s easy!”
You insert a Custom Snippet the same way as inserting a
System Snippet, simply double click on it to insert it into the Rule Editor and edit as required.
A few other helpful things about Custom Snippets:
- When deleting a Snippet Category, you’ll get asked if you want to delete the rules inside that category or move them to a Default category.
- You can drag and drop snippets from one category to another.
- You can merge snippets from one file to another using the tool on top of the Custom Snippets tab.
- If you create a category but don’t put a snippet inside of it, the category will not save.
- Use the Save and Open buttons at top to make sure everyone on your design team is pointing at the same Custom Snippets file.
I am still on the lookout for other ways of storing iLogic
rules. Ideally, something that multiple
users could access and easily search for keywords and tags. If you have any suggestions that you’d like
to share, please leave a comment below.
Randy
"Challenge yourself with something you know you could never do, and what you'll find is that you can overcome anything." - Anonymous
