Wednesday, June 10, 2015
Inventor Automation Workshop
Attending the Work Smarter, Not Harder: Streamline Your Design Process and See Instant ROI webcast. Join me? http://imgn.it/NP8os

Monday, December 1, 2014
We're going to need a bigger box...
Wouldn't it be nice if every time you reached into your toolbox you could pull out the perfect tool for the job? You never had to use a pair of pliers to remove a spark plug? You never had to resort to hacking through that wire with dull scissors?
The Inventor iLogic integrated development environment, (IDE), provides an awesome set of tools for quickly crafting conditional automation code. i.e. "If this hole increases in size by x, Then thicken they webbing member by y."
This conditional logic is in fact the central theme of this blog; if this happens, then do that. Pretty simple right?
What happens when simple conditional logic or using the provided code snippets don't measure up to the task at hand? Fear not! There is a solution. A solution that's not well documented or advertised but that's been available nearly since iLogic's inception. "...pssst, you can use, (reference), other code libraries and frameworks within the iLogic IDE.
After you've made the reference, you can call into those libraries and execute publicly exposed functions just as if they were your own.
You can add references in two ways, AddReference "System.Drawing.dll" or through the Imports statement, as in Imports System.IO. Inventor iLogic automatically "includes" the following .NET framework libraries or namespaces:
- System
- System.Math
- System.Collections
- Microsoft.VisualBasic
- Autodesk.iLogic.Interfaces
- Autodesk.iLogic.Runtime
Hmmmmm, seems that iLogic is capable of leveraging the Microsoft .NET framework. Well isn't that handy. More later...
Let's take a look at a simple example that checks to see if a file exists.
Imports System.IO

Sub Main()
    Dim fName As String = "C:\Temp\rt1.ipt"
    If file.Exists(fname) Then
        MsgBox(fName & " exists!")
    End If
End Sub
If the file is really there, we get this result:

Let's try another:
Imports System.IO

Sub Main()
    Dim path As String = "C:\temp\text.txt"
    File.AppendAllText(path, "test message" + vbCr)
End Sub

The above code snippet can be very useful for adding entries to a "log file".
I've always been a firm believer that if you intend to use a block of code more than once it deserves to me its own method or function. Let's look at some other ways to code this in a little more efficient and professional manner.
Option 1 (Method)
Imports System.IO

Sub Main()
    Dim path As String = "C:\temp\text.txt"
    Call LogWriter(path,"Message passed as argument")
End Sub

Private Sub LogWriter(ByVal path As String, ByVal msg as String)
    File.AppendAllText(path, msg + vbCr)
End Sub
Now whenever we need to write a new line to our log file we just pass the path and the message, and the Call keyword is optional. LogWriter(path,"Message passed from a method")
We don't "expect" anything to go wrong because the .AppendAllText will create the file if it doesn't exist. Oh wait, what if I typed the folder path wrong?Let's add some error handling.
Imports System.IO

    Sub Main()
        Dim path As String = "C:\temp\text.txt"
        LogWriter(path, "Message passed as argument")
    End Sub

    Private Sub LogWriter(ByVal path As String, ByVal msg As String)
        Try
            File.AppendAllText(path, msg + vbCr)
        Catch ex As Exception
            MsgBox(ex.Message, MsgBoxStyle.Critical, "Something has gone horribly wrong!")
        End Try

    End Sub
The Try/Catch block is your friend. Think of it as the modern-day equivalent of the old
On Error Resume Next. The concept is super simple, "Try" this block of code, "Catch and handle any errors."
You may also be interested in File.Move, File.Copy, File.Exists or File.Replace. Check out all of the File Class methods or the entire.NET Framework Class collection.
In the coming weeks/months extend this post to include "methods vs. functions", linking to data sources and expanded form functionality.
If you've learned one new thing by reading this post I've achieved my goal.
Happy Trails!
Thursday, November 20, 2014
Generate Drawings using iLogic Webcast
Hey everyone,
Wanted to give everyone a heads up that our own Carl Smith will be hosting a webinar today and discussing using iLogic to generate Inventor drawings.
It's free and I'm sure you'll pick up at least one thing that will help you in all your automation endeavors.
Generate Drawings using iLogic Webcast
Thursday, November 20
11:00 AM Eastern Time
REGISTER NOW
In case the above link doesn't work:
http://www.imaginit.com/Events/Registration/eventid/a2w700000000FBJAA2
Thanks,
Randy
Wanted to give everyone a heads up that our own Carl Smith will be hosting a webinar today and discussing using iLogic to generate Inventor drawings.
It's free and I'm sure you'll pick up at least one thing that will help you in all your automation endeavors.
Generate Drawings using iLogic Webcast
Thursday, November 20
11:00 AM Eastern Time
REGISTER NOW
In case the above link doesn't work:
http://www.imaginit.com/Events/Registration/eventid/a2w700000000FBJAA2
Thanks,
Randy
Monday, September 29, 2014
Drawing View Scale Part II
 In my last post, I discussed one solution to get a drawing view scale. That solution found the drawing view with the lowest numerical value as part of view name (VIEW1, VIEW5, etc.) and used it's scale as an iProperty of the drawing.
Another solution that my client wanted was to present all the view names and allow the user to select which view he/she wanted to represent the scale in the title block.
Like the first solution, we cycled through each sheet on the drawing and looked at the view name. If the view name begins with "VIEW" then it was used to build a one dimensional array. We also concatenated the view scale with the view name to satisfy the needs of seeing both the view name and the view scale.
'    Cycle thru each sheet.  Build array of View Name and View Scale.
     For Each oSheet In oSheets
         oViews = oSheet.DrawingViews
         For Each oView In oViews
             oViewName = oView.Name
             If Left(oViewName,4) = "VIEW" Then
                 oScale = oView.Scale
                 oConc = oViewName & ": @ " & oScale
                 oViewList.Add(oConc)
             End If
         Next
     Next
We then sorted the array and set a MultiValue list using that array.
'    Sort array
     oViewList.Sort

'    Set Multi-Value List from array
     MultiValue.List("ViewList") = oViewList
Next we presented an input box to the user using the MultiValue list.
' Present Input Box for user selection selected = InputListBox("Select a view from the list", _MultiValue.List("ViewList"), oViewList.item(0), Title := "Views", _ListName := "View Name @ Scale")
Next we extracted the view name and view scale from the user selection.
' Extract View Name and View Scale from user selectiondelimpos = InStr(selected, "@") oSelectedView = Left(selected,delimpos - 1) oSelectedScale = Right(selected,Len(selected)-delimpos)
Finally, the view scale was pushed to a custom iProperty that was displayed in the drawing title block.
' Set custom iProperty based on user selection iProperties.Value("Custom", "Scale") = RoundToFraction(oSelectedScale, 1/8, _RoundingMethod.Round) & ":1"
The full code is listed here:
' Setting Variables Dim oDrawDoc As DrawingDocument = ThisDrawing.Document Dim oSheet As Sheet Dim oSheets As Sheets oSheets = oDrawDoc.Sheets Dim oView As DrawingView Dim oViews As DrawingViews Dim oScale As Double Dim oViewName As String Dim oConc as String Dim oSelectedView As String Dim oSelectedScale As String Dim oViewList As New ArrayList ' Cycle thru each sheet. Build array of View Name and View Scale. For Each oSheet In oSheets oViews = oSheet.DrawingViews For Each oView In oViews oViewName = oView.Name If Left(oViewName,4) = "VIEW" Then oScale = oView.Scale oConc = oViewName & ": @ " & oScale oViewList.Add(oConc) End If Next Next ' Sort array oViewList.Sort ' Set Multi-Value List from array MultiValue.List("ViewList") = oViewList ' Present Input Box for user selection selected = InputListBox("Select a view from the list", _ MultiValue.List("ViewList"), oViewList.item(0), Title := "Views", _ ListName := "View Name @ Scale") ' Extract View Name and View Scale from user selection delimpos = InStr(selected, "@") oSelectedView = Left(selected,delimpos - 1) oSelectedScale = Right(selected,Len(selected)-delimpos) ' Set custom iProperty based on user selection iProperties.Value("Custom", "Scale") = RoundToFraction(oSelectedScale, 1/8, _ RoundingMethod.Round) & ":1" ' Update iLogicVb.UpdateWhenDone = True
PS - Sorry about the formatting. I can't seem to get those extra spaces out of the sections where I've broken up the code.
Please leave a comment and let me know what you think.
Randy
"Opportunity is missed by most people because it is dressed in overalls and looks like work." - Thomas Edison
Tuesday, September 23, 2014
Drawing View Scale Part I
Even in today's CAD world, we often include and display the drawing scale in the title block. In the past, this was more of a requirement than it is today. Today someone on the manufacturing floor can just as easily (and more accurately) pull up the CAD model on their terminal and take measurements. There are many students in my training classes that don't even know what item is shown in the image below.
It is a typical practice for Inventor users to display the scale of the first view created in the drawing title block.
I recently ran into a situation where the client wanted two methods to pull a drawing scale to include in the title block:
I'll discuss the first solution in this blog post. The solution included just a few steps.
We cycled through each sheet on the drawing and looked at each view name. If the view name begins with "VIEW" then it was used to build an one dimensional array. This step ensured we didn't pull views such as section or detail views.
We then sorted the array and pulled the view scale of the first index of the array.
The view scale was pushed to a custom iProperty that was displayed in the drawing title block.
The full code is listed here:
Next post I'll discuss the second option where we displayed the view names and scales and allowed the user to select which scale to use in the title block.
As always, leave a comment and let us know how this has helped you.
 |
| Engineer's Scale |
I recently ran into a situation where the client wanted two methods to pull a drawing scale to include in the title block:
- Find the view name with the lowest numerical value and use its scale in the title block
- Present the user with all drawing views, and their scales, on a drawing and allow the user to select which view he/she wanted to represent the scale in the title block
I'll discuss the first solution in this blog post. The solution included just a few steps.
We cycled through each sheet on the drawing and looked at each view name. If the view name begins with "VIEW" then it was used to build an one dimensional array. This step ensured we didn't pull views such as section or detail views.
' Cycle thru each sheet. Build array of View Name and View Scale. For Each oSheet In oSheets oViews = oSheet.DrawingViews For Each oView In oViews oViewName = oView.Name If Left(oViewName,4) = "VIEW" Then temp = Right(oViewName,1) oViewList.Add(temp) End If Next Next
We then sorted the array and pulled the view scale of the first index of the array.
' Sort array oViewList.Sort ' Get scale of lowest View oSelectedScale = ActiveSheet.View("VIEW" & oViewList(0)).Scale
The view scale was pushed to a custom iProperty that was displayed in the drawing title block.
'    Set custom iProperty based on user selection
     iProperties.Value("Custom", "Scale") = RoundToFraction(oSelectedScale, 1/8, _
     RoundingMethod.Round) & ":1"
The full code is listed here:
'    Setting Variables
     Dim oDrawDoc As DrawingDocument = ThisDrawing.Document
     Dim oSheet As Sheet
     Dim oSheets As Sheets
     oSheets = oDrawDoc.Sheets
     Dim oView As DrawingView
     Dim oViews As DrawingViews

     Dim oScale As Double
     Dim oViewName As String
     Dim oViewList As New ArrayList

'    Cycle thru each sheet.  Build array of View Name and View Scale.
     For Each oSheet In oSheets
     oViews = oSheet.DrawingViews
         For Each oView In oViews
            oViewName = oView.Name
            If Left(oViewName,4) = "VIEW" Then
                temp = Right(oViewName,1)
                oViewList.Add(temp)
            End If
         Next
     Next

'    Sort array
     oViewList.Sort

'    Get scale of lowest View
     oSelectedScale = ActiveSheet.View("VIEW" & oViewList(0)).Scale

'    Set custom iProperty based on user selection
     iProperties.Value("Custom", "Scale") = RoundToFraction(oSelectedScale, 1/8, _
     RoundingMethod.Round) & ":1"

'    Update
     iLogicVb.UpdateWhenDone = True
Next post I'll discuss the second option where we displayed the view names and scales and allowed the user to select which scale to use in the title block.
As always, leave a comment and let us know how this has helped you.
Randy
"The difference between try and triumph is a little umph." - Unknown
Friday, September 12, 2014
Searching Excel with iLogic II: Header Rows
A few blogs back, my partner in crime Carl Smith posted about searching Excel with iLogic as a means of gathering data for ever changing projects. This has come in handy multiple times for me.
 I recently had a case where a client had a very nice looking Excel file with data at the top. This forced the column headers I was searching for down a few rows. An example is shown to the right.
By default, the GoExcel.FindRow likes the Column that is searching for to be in Row 1 of the worksheet.
This can be changed by using GoExcel.TitleRow. This will allow you to tell iLogic what row to start looking for column names.
Before your GoExcel.FindRow command, add:
Replace the X with the row your Column headings are located in.
Here is what the code section would look like:
Randy
I recently had a case where a client had a very nice looking Excel file with data at the top. This forced the column headers I was searching for down a few rows. An example is shown to the right.By default, the GoExcel.FindRow likes the Column that is searching for to be in Row 1 of the worksheet.
This can be changed by using GoExcel.TitleRow. This will allow you to tell iLogic what row to start looking for column names.
Before your GoExcel.FindRow command, add:
GoExcel.TitleRow = X
Replace the X with the row your Column headings are located in.
Here is what the code section would look like:
GoExcel.TitleRow = 8
i = GoExcel.FindRow("SalesOrders.xlsx", "Header", "Part Number", "=", PartNumber)

Description = GoExcel.CurrentRowValue("Description")
Length = GoExcel.CurrentRowValue("Length")
Randy
"I have not failed. I've just found 10,000 ways that won't work." ~Thomas A. Edison
Friday, June 20, 2014
Now Where Did I Put That Code? Ah, my Custom Snippets!
If you’re anything like me (and I’ll assume you are unless you randomly pick blogs to read) then you’ve been writing iLogic code for the past 3 years or so and have amassed a large amount of code. All that code is probably sitting in various part, assembly or drawing files.
About a year ago I decided I needed to do some tidying up and figure out a way to store all my iLogic code in a manner that I could easily search, retrieve and copy the code I know I have somewhere…it does X…and I wrote it for client Y….I think.
I am still on my quest to find the perfect vehicle to do everything but I recently decided to take a closer look at the simple storage method that Autodesk already gives us, Custom Snippets.

 To insert a new Snippet category, right click in the Custom Snippets window and choose Insert Category. Enter a category. In this example I’ll be categorizing them using client names and call this one ACME. Unfortunately you cannot create nested categories.
You’ll be presented with the Edit Snippet dialog box.
About a year ago I decided I needed to do some tidying up and figure out a way to store all my iLogic code in a manner that I could easily search, retrieve and copy the code I know I have somewhere…it does X…and I wrote it for client Y….I think.
I am still on my quest to find the perfect vehicle to do everything but I recently decided to take a closer look at the simple storage method that Autodesk already gives us, Custom Snippets.
Custom Snippets work the same as the System Snippets with the difference being they are your code. They are an easy way to insert
your own bits of code into your iLogic rule.
Let’s say I've written a few lines of code that I’ll be using in a few
different parts in my current project.
Now, there are multiple ways of getting this rule into
parts. I could put it in the template, I
could use external rules, I could use the Code Injector (which is a lovely tool
that you should check out if you don’t already use it). I don’t want to argue the merits of each of
these and just focus on Custom Snippets for now.
One decision to make is how you want to categorize your Custom Snippets. You can create individual categories for specific projects, clients, code type, etc. I
prefer to create categories by either code type or client name and saving my
snippets that way.
To insert a new Snippet category, right click in the Custom Snippets window and choose Insert Category. Enter a category. In this example I’ll be categorizing them using client names and call this one ACME. Unfortunately you cannot create nested categories.
Once you’ve created a category, it’s time to start filling
it up with all that helpful code you’ve already written. Highlight the code in the Rule Editor that
you want to save (I always select all the code, including empty spaces or tabs
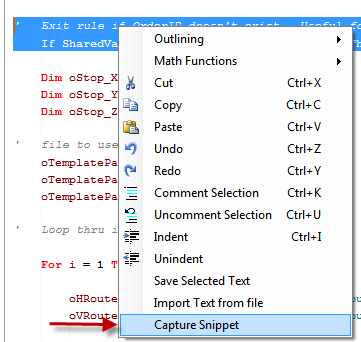
to the left so that they are captured), right click and choose Capture
Snippet.
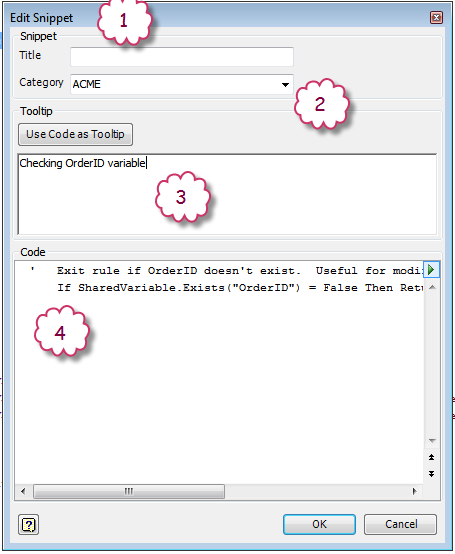
You’ll be presented with the Edit Snippet dialog box.
- Title of the Snippet. This shows in the Snippets listing.
- Which category would you like to store the Snippet?
- Text entered here will show up as a tooltip when hovering over the Snippet in the Snippet listing. I prefer a short blurb rather than using the code as the tooltip. The code is shown at the bottom of the tooltip by default.
- The code you highlighted will show up here. You can edit here but I find it easier to edit in the Rules Editor.
As my favorite knigget said “That’s easy!”
You insert a Custom Snippet the same way as inserting a
System Snippet, simply double click on it to insert it into the Rule Editor and edit as required.
A few other helpful things about Custom Snippets:
- When deleting a Snippet Category, you’ll get asked if you want to delete the rules inside that category or move them to a Default category.
- You can drag and drop snippets from one category to another.
- You can merge snippets from one file to another using the tool on top of the Custom Snippets tab.
- If you create a category but don’t put a snippet inside of it, the category will not save.
- Use the Save and Open buttons at top to make sure everyone on your design team is pointing at the same Custom Snippets file.
I am still on the lookout for other ways of storing iLogic
rules. Ideally, something that multiple
users could access and easily search for keywords and tags. If you have any suggestions that you’d like
to share, please leave a comment below.
Randy
"Challenge yourself with something you know you could never do, and what you'll find is that you can overcome anything." - Anonymous
Subscribe to:
Posts (Atom)